Specifications & Instructions
English - Manufactured after 08.01.2017
INSTRUCTIONS FOR CR1R AND CR3BCB
Battery Installation:
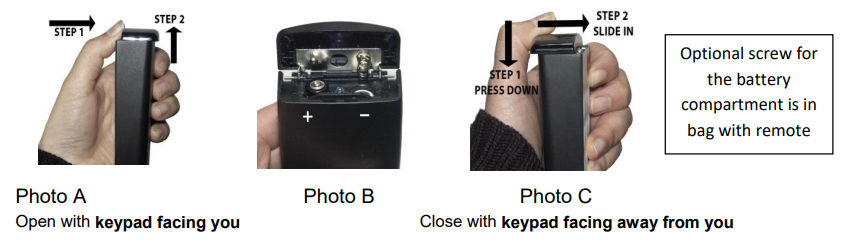
- To open cover: With keypad facing you, first slide dark lens cover away from you (photo A, step 1) and then lift lid upward from the back (photo A, step 2)
- When placing two AAA batteries in the compartment note the + and - symbols on the metal hinge should make contact with the corresponding + and - end of each battery (photo B).
- Closing cover: With keypad facing away from you gently close cover by pressing downward (photo C, step 1) and sliding it toward the front (keypad) until it is aligned. (photo C, step 2)
- Test remote by pressing the power button; the LED should light indicating that the batteries are in correctly. If the LED doesn‘t light, then the batteries are either in wrong or the batteries are bad.
Easy TV Setup
- Turn on the TV and then stand back about 5 feet from TV and Point the remote at the CENTER of the front panel of the TV. It will not be necessary to point the remote at that exact area once the remote is set-up.
- Press and firmly Hold down the Setup button, do not release. The LED will blink once and then after 7 seconds it will initiate code search. The LED will continue to blink every 2 seconds. Once your TV shuts off immediately remove your finger from the Setup button; the code automatically locks in.
-
Test the remote:
- For TV Only: Test Power, Volume and Channel Functions, if all work correctly setup is complete. If not, you may not have an exact code match. Start again at step #1. The code search will continue where it left off.
- For TV Plus Cable Box: Only test Power and Volume function, DO NOT CHANGE CHANNELS. If these functions operate correctly See Cable Box Setup below.
Important Note: If you think you missed the code or you intend to use the remote on a different brand TV: See trouble shooting guide, scroll down.
Cable Box Setup

You must first complete TV setup before proceeding.
-
With the cable box ON, Press and Hold Down both the SETUP and ENTER buttons at the same time,until the LED light turns on and remains ON. -
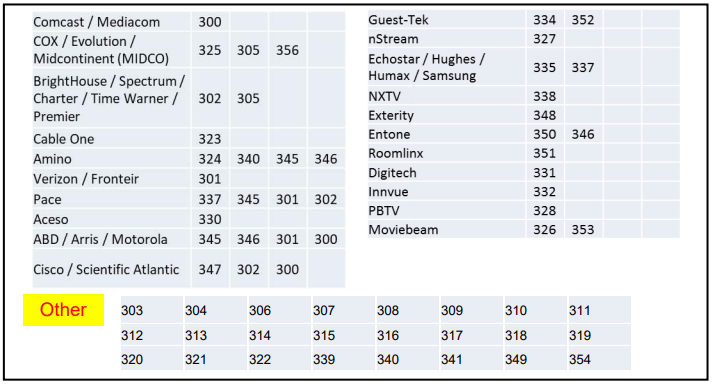
Enter the three digit direct access number for your brand from the list below; the LED light will then turn off confirming it was accepted.
Now test the remote: Point the remote toward the Cable Box and TV and try the CH+ and CH- buttons as well as the the channel numbers. If the channels change correctly, make sure VOL+ , VOL- and TV power (ON and OFF) work. If they do, you are done. If not, repeat these steps with all the access numbers listed for your brand before trying the numbers listed as "Other".
Hint: If your Cable Provider is not listed, please search by the manufacturer of your cable box
Note: If your cable box has a power button, use the CBL button on Clean Remote to power it on or off.
TROUBLESHOOTING INFORMATION
Important Note: If you think you missed the TV code or you intend to use the remote on a different brand TV: Reset the remote back to the beginning of the code search: Press and hold the SETUP button down, then press and hold the CC button down at the same time until the red LED light blinks quickly 3 times, then release both buttons. You have now reset the code list back to the beginning. Then see Easy TV Setup on page 1.
Reset remote to work TV only without a cable box.
If you've already set up the remote to work both a TV and a Cable Box and now wish to operate TV only without a cable box. Hold down the  button and SETUP button together until the remote blinks 3 times quickly and immediately release both buttons. Then follow the Reset instruction in the above paragraph